Showing posts with label decor. Show all posts

Wednesday, November 9, 2011

So shady {lampshade love}


This lamp, on The Hubs side of the bed, has bugged me FOREVER. It was the first lamp I ever bought and I, for some unknown reason, thought this lamp shade looked good with it. For about 5 minutes. What was I thinking?!? It looks like a little kid wearing his dad's hat. Heck, it looks like a little kid with a ridiculous lamp shade on its head. You know the worst part? I'm pretty sure that when I picked this bad boy up at Target 9 years ago, the lamp had an "S" on it for small, and the shade had an very clearly marked "M" for medium. I guess I thought I knew better than those crazy folks at Tarjay (which G told me we should always call it instead of Target. Ooh la la.).

Well, when we moved time before last, this happened...


I hot glued it but when we moved this time...5 months later, and one year ago, the glue came undone. The lamp has been sitting next to the bed for a year looking like this. Not plugged in. Because I kept thinking I would replace the darn thing and why exert all that energy leaning over behind the night stand, using contortionist maneuvers to plug it in (Note to self: Sign up for yoga, you lazy fool!).

So yesterday, while at Lowes getting supplies for my latest Pinterest inspired project, I saw this little shade for only $10.


I had assumed I'd replace the whole she-bang, lamp and shade. But this little drummer boy (getting in the Christmas spirit, folks!) was perfect. And, while I still think the lamp isn't right for our bedroom, it looks so much better and can be transferred to the bonus room or one of the girls' rooms without me feeling shame for that shady, disgrace of a lamp.


I think I'll trim it with a little ribbon for some za za zing, but that can wait for another day. Oh, and paint for this room will be happening when we get the upstairs painted! Very soon!!! Followed by window treatments (which are done but I didn't want to hang them until we painted).

Friday, October 28, 2011

I've finally found it!


I've been looking for fabric to cover our living room ottoman. This indoor/outdoor fabric from Richloom is perfect. Just the right amount of red and green and BLUE, which I like to work in during the spring and summer months. And at $11 a yard I don't think I'll find anything better. Now I have to decide if I want to try my hand at making piping. Yikes!

Friday, September 30, 2011

It's Fall Y'all {Door Decor Linky Party}


I love my mom's fall front porch and door decor this year.


I believe she purchased the wreath but added the sunflowers herself. Which I think takes it from pretty to PRETTY FREAKIN' AWESOME!!!

The floral arrangement in the corner of the porch is in a unique and totally sweet "vase." Its a giant old spring of some sort and I think it has tons of personality.

We got the pumpkins the other day at a local fruit and veggie roadside stand (where I've been getting my pumpkins my whole life). I took a bunch of pics of the girls while we were there but most of them are overexposed. Stinkin' bright afternoon sun. G got to pick all the tiny egg gourds herself from the owner's garden. She let her get 1 for each person in our family. So it was fun and educational! Science = how things grow. Math = counting how many of us there are, then counting that many gourds. Gotta love livin' in the country.

But I think my favorite thing of all is the small, black "Welcome" sign my mom painted. Its just the perfect touch and we've already decided that she needs to create one for each season.


She needs to paint the (new-ish) front door and I'm trying to sway her towards black. The shutters are already black and I think it would bring a lot of dimension to the porch. Maybe I should just do it for her and not give her a choice!

Happy Fall. See you at the linky party!

Friday, September 23, 2011

61 years {and a photo wreath}


Today my daddy turns 61 years old. We are extra glad to celebrate because he is battling cancer and as many of you know that makes each day, and especially each birthday, more precious. My sister made a photo wreath displaying some of his old family photos. Its a quick project and so fun to look back and remember his carefree childhood days.


I gave my sister a hard time because she doesn't have a fall wreath on her door yet (doesn't she know its official TODAY!).

magnetic photo wreath

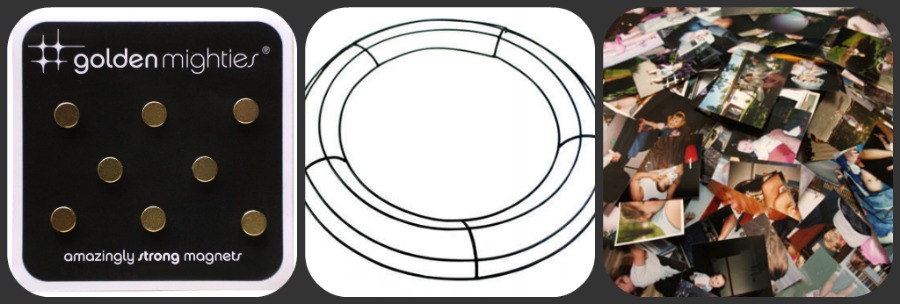
Wasn't he the cutest, chubbiest, little baby?!? In addition to photos, she also used his 1st birthday invitation, a report card from second grade (he tried to explain away his low grade in religion from Catholic school!), and his high school graduation announcement. To make this yourself all you need is:


super strong mini magnets, metal wreath form, a stack of pics

You can get both the magnets and wreath form at Hobby Lobby, Michaels, JoAnns, etc. for under $15. And if you have a coupon or wait for the sale then the project would be even less expensive. Such a fun way to share photos! And you can change it up seasonally or with your mood. I'll definitely be getting the supplies for this next time I have a coupon or see a wreath sale at Michaels.

Love you so much Daddy! Thanks for being the best vacation dad a girl could ask for and for loving me even when I wouldn't practice my pitching (ah, teenagers!).

I'm linking up!

Confessions of a Stay At Home Mommy


Tip Junkie handmade projects


Join  us Saturdays at tatertotsandjello.com for the weekend wrap up party!


Weekend Bloggy Reading


I Heart Nap Time

Home Stories A to Z

Monday, September 19, 2011

Ruffle Pillow Tutorial

ruffle pillow


So this pillow is a birthday present for my sister. Her birthday was in March. Oops. Better late than never, right?
She had seen an image of a ruffle pillow and asked me if I could make her one. I told her "Sure!" then frantically scoured the internet took a quick look on line for a tutorial. But I only found tutorial geared toward using a t-shirt. This just would not do! No, no, no! Why, you ask? Because t-shirt fabric doesn't fray and my fabric definitely does. I needed the ruffles to have a finished, or hemmed, edge. So here is my version of the ruffle pillow tutorial:

You will need (for 16 inch pillow):

1 yard fabric
scissors
ruler/tape measure
coordinating thread
sewing machine
pillow insert or pillow fill
iron

Step 1: Cut 2 pieces of chosen fabric for front and back of pillow.


My pillow form is 16" so I cut 2 16x16 squares. I have learned NOT to cut extra for a seam allowance when making pillows. It looks better when finished. Weird, huh?

Step 2: Cut strips from remaining fabric. These will become the ruffles. My strips are 3x29 inches. I have 12 total for my 16 inch pillow. You may need to adjust this if you're making a larger/smaller pillow. This took FOREVER because I didn't have a cutting mat and rotary cutter, which I recommend. I just used scissors. Bah.


Step 3: Fold each strip in half, right side together. What does that mean? Right side? Its the front of your fabric (in case your a newbie). Sew down the cut edge with a 1/4 inch seam allowance. Just for future reference, I always do a 1/4" allowance.

Step 4: You have now created a tube of fabric. But, uh-oh! It's wrong side out. You'll need to turn it by pinning in a safety pin to one end


Push the pin through the inside of the tube, scrunching the fabric as you go until it sticks out the other end and you can pull it through.
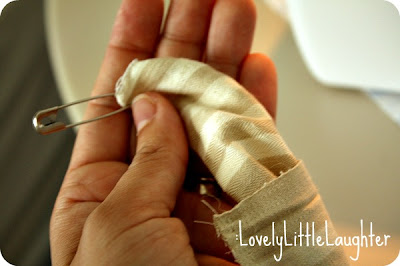


turning tube or strip of fabric right side out


Sorry if some of this seems a little too elementary, but I was new to sewing once (wait, I still am!) and these kind of tips would have been REALLY helpful.

Step 5: Press fabric "tube" flat with the seam in the middle(ish) of the back.


Don't worry if the seam is not perfectly straight or perfectley centered. You won't see this part anyway.


You might also want to iron your pillow front and back fabric now, too. Maybe. If you're the ironing type.

Step 6: Now we'll create our ruffles. Set your sewing machine to a longer "basting" stitch. For me, this means putting the length setting on 4 and the tightness (I guess that's what its called) dial on 2 but you'll have to look this up for your own machine. Sew down the center of each fabric strip WITHOUT BACKSTITCHING!!!


You want to leave pretty long "tails" of thread on either end. Also, you want to put the seam that you created down so the bobbin thread is on this back side.

Step 7: Gather the fabric of each strip into ruffles by pulling/holding the bobbin (that's the back or bottom) thread and sliding or scrunching the fabric up.


Woo to the hoo! You've created ruffles. Sort of. They don't look too hot until we put them on the pillow fabric.


Step 8: Pin the ruffles to your pillow front. Grab one of those 16 inch squares (if there is a flaw in either piece, use that as the front. It will mostly be covered by the ruffles). Pin the end of your ruffle flat to the end of the fabric leaving a little bit (1/4 inch-ish) of overhang. Continue to pin the ruffle in place, scrunching and flattening to your liking, across the width of the pillow.


You can pin each one down now, or wait and pin, sew, pin, sew, etc. I like to pin each ruffle one at a time to make sure I like how its looking and because there's less fabric to manuever around the sewing machine. Also, you want to use a pin every inch to inch and a half and would need A LOT of pins to put all the ruffles in place before sewing. I lined my ruffles right up next to each other but if you don't have enough to entirely cover the pillow front, be sure to space them evenly (this might be a good reason to pin all the ruffles BEFORE sewing).


Step 9: Sew down the center of each ruffle. Don't forget to reset your machine back to a regular straight stitch. You can also TRY to sew over the original seam that is there from creating the ruffle but if your thread matches your fabric, well, its not too important (unless you're a perfectionist and in that case, this is probably NOT the tutorial for you).


Repeat this 12 times and voila! you have a ruffle-y pillow front. At this point, you may pause and admire your awesomeness.

Step 10: Back to reality. You still have to turn the ruffle-y goodness into a pillow. Pin the now ruffled pillow front to the plain pillow back with the right sides together (the ruffles will be on the inside against the back pillow fabric). Be VERY CAREFUL to keep the top ruffle from getting in the seam. You don't want to sew it down! Sew around 3 sides (top, 2 sides) and about 2 inches on either end of the bottom, leaving an opening for stuffing in the pillow form or fill.

Step 11: Trim all the crazy threads (and there will be a ton!)


and the excess overhang fabric from the strips.


Step 12: Turn the pillow cover right side out (again, admiring your awesomeness) and stuff that baby!


I prefer pillow forms but if you want a unique size fluffly fill is the way to go.

Step 13: Close the opening left at the bottom. I hand-stitched mine because I have trouble getting my machine close enough to the edge but you can do this however you want. If you're not sure how, just check this out to do it by hand or this if you're going to use your machine.


ruffle pillow


You're finished! Isn't it so awesome?!? I'm going to have to try this again using a variety of colors. I think it could be a great way to use up some scraps and create a seasonal pillow (right now I'm seeing rusty oranges and reds for fall). Hope you will share pics of your ruffled pillows with me. Leave a link to your blog or in the comments!

I'm linking up!


Confessions of a Stay At Home Mommy


Tip Junkie handmade projects


Join  us Saturdays at tatertotsandjello.com for the weekend wrap up party!


Weekend Bloggy Reading


I Heart Nap Time
Craft-O-Maniac
Home Stories A to Z

Monday, August 29, 2011

Poms the bomb.


I've been on a kick lately of using old-school, common crafting materials to make stuff. First was the felt circle pillow (um, using what else, felt), then the circle paper garland (regular construction paper), and now I'm gonna show you what I did with little fuzzy pom poms. I don't think I've even touched one of those since vacation bible school when I was 10, but retro is cool, right? Anyway, I was inspired by this image from Pinterest:


Source: pickles.no via Lovely on Pinterest

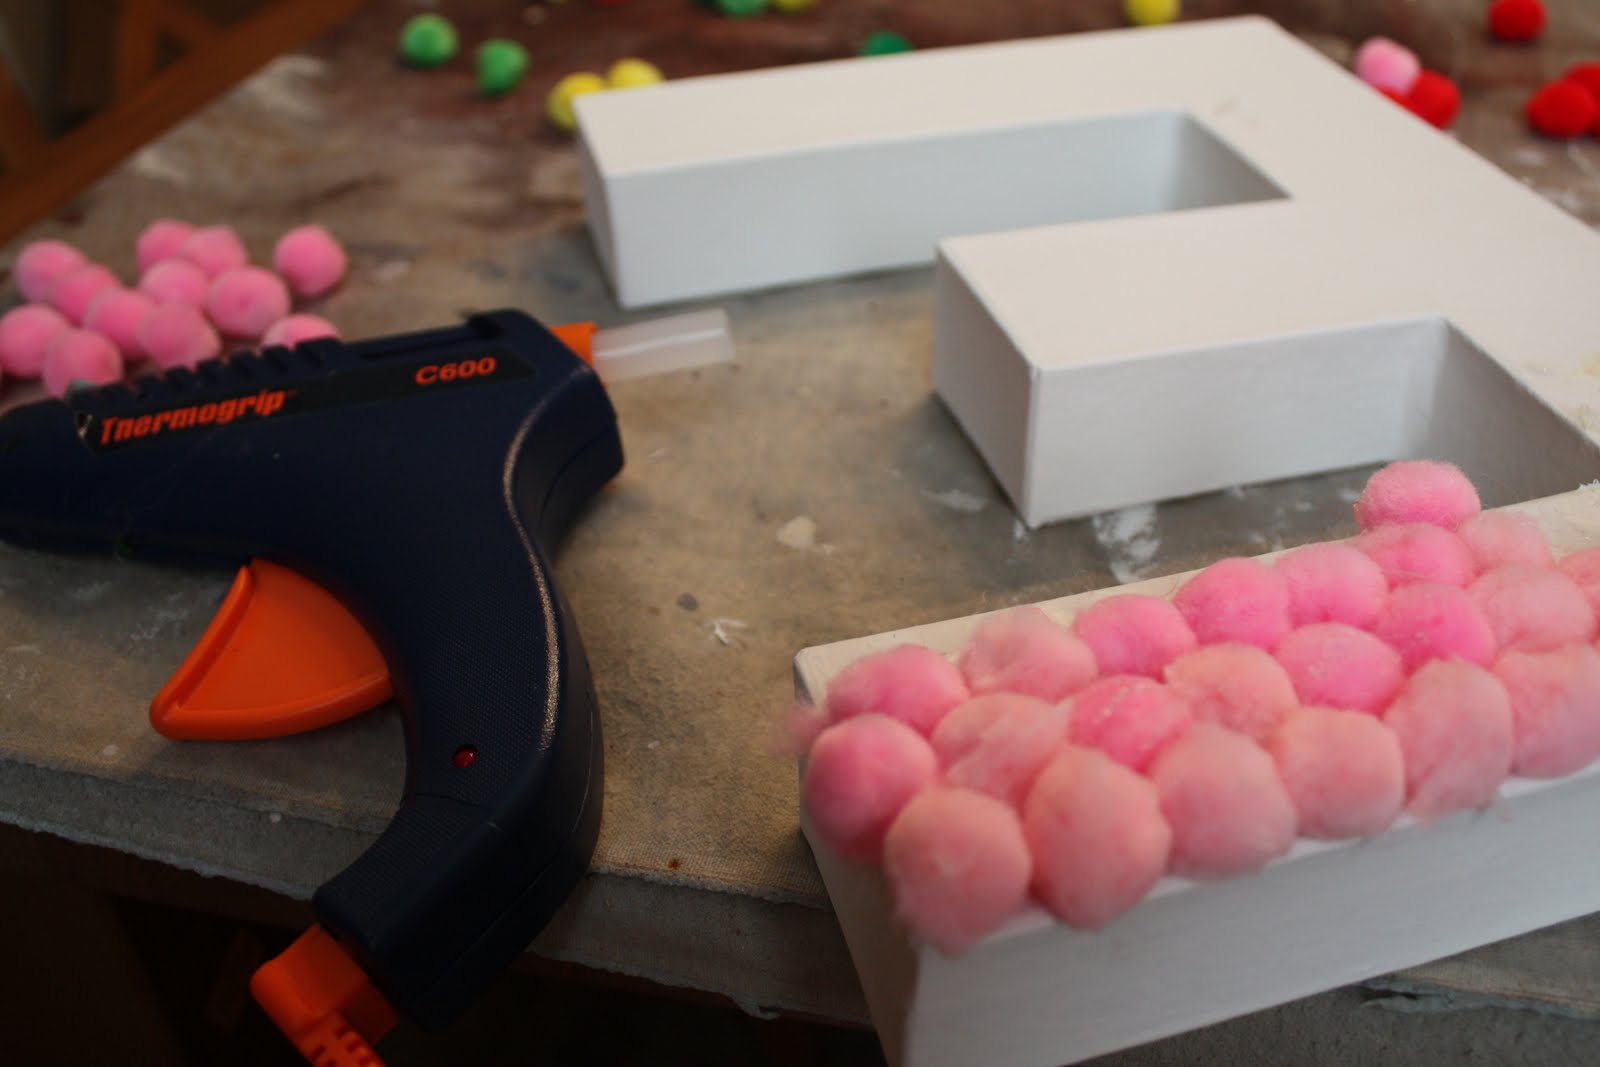
These are some much fancier type of ball but I just loved the look and decided to make my spin on it for E's birthday. I got a big ol' E from JoAnns, a few bags (I used almost 4) of poms at Michaels, and wet to work with my hot glue gun.

First I painted the cardboard E because, you know, it was brown. I just used some white wall paint that was left by our builders. I think if I'd used craft paint I could have done the project with Elmer's glue but the interior paint was a little too slippery (and The G didn't appreciate the blister she got from touching some not-so-dry hot glue. oops.).


I think if I'd used craft paint, I could have done the project with Elmer's glue but the interior paint was a little too slippery (the Elmer's would have been nice because The G didn't appreciate the blister she got from touching some not-quite-dry hot glue. oops.

Here's an in-process shot:


I was making this for her birthday so I went with the rainbow theme and I think it turned out super awesome!

rainbow pom pom letter

I hung it on the front door on party day, brought it in after everyone had arrived for some photos, and now I think I'll hang it in her room. I'm hoping this can be a photo prop for all her future birthdays (at least until she's 12 or so and thinks everything I do is totally lame). What do you think? Sound like a good idea?


This was at 8:30 at night after the party. She was definitely ready for bed so I need to set Sweet E up with her "E" again for a true photo op.

Have you done any crafts lately with elementary-school inspired materials? Finished any Pinterest inspired crafts? Let me know! I'd love to check them out.

Update: The day I wrote this post I got an issue of FamilyFun Magazine in the mail and lo and behold, what was on the cover? You guessed it. A pom pom craft.


Looks like these little guys are making a resurgence (or maybe they were never uncool?).


I'm linking up at:

Confessions of a Stay At Home Mommy


CraftOManiac