Friday, September 30, 2011

It's Fall Y'all {Door Decor Linky Party}


I love my mom's fall front porch and door decor this year.


I believe she purchased the wreath but added the sunflowers herself. Which I think takes it from pretty to PRETTY FREAKIN' AWESOME!!!

The floral arrangement in the corner of the porch is in a unique and totally sweet "vase." Its a giant old spring of some sort and I think it has tons of personality.

We got the pumpkins the other day at a local fruit and veggie roadside stand (where I've been getting my pumpkins my whole life). I took a bunch of pics of the girls while we were there but most of them are overexposed. Stinkin' bright afternoon sun. G got to pick all the tiny egg gourds herself from the owner's garden. She let her get 1 for each person in our family. So it was fun and educational! Science = how things grow. Math = counting how many of us there are, then counting that many gourds. Gotta love livin' in the country.

But I think my favorite thing of all is the small, black "Welcome" sign my mom painted. Its just the perfect touch and we've already decided that she needs to create one for each season.


She needs to paint the (new-ish) front door and I'm trying to sway her towards black. The shutters are already black and I think it would bring a lot of dimension to the porch. Maybe I should just do it for her and not give her a choice!

Happy Fall. See you at the linky party!

Thursday, September 29, 2011

9 years later {a wedding anniversary}


Today is the ninth anniversary of my marriage. I love him more today than 9 years ago even though I didn't think that was possible at the time.

We had a lovely day, surrounded by people who loved us. But, I don't think there are many of us out there that wouldn't do a few things differently in terms of the EVENT (not the marriage). It was the perfect mix of fun and craziness...just what you want at 22 years old!

Here is what I would do if I was getting married September 29, 2011 instead of 2002.


The dress...
This dress has pockets! How awesome is that?!? I love the simple line and true waist. And, its the same designer that made my 2002 dress. Its funny because when I got married 9 years ago, I really liked dropped waist gowns with box pleats (not that thats what I wore). Hmmm. Quite a departure. When I got married I had just come off of a year and a half working at a bridal boutique. I had tried on DOZENS of wedding gowns and didn't ever get that "this is the ONE" feeling. Oh wait, yes I did. And it was $4000. Not happening my friends. I'm also drawn to more fitted, lacy gowns these days but that style really doesn't fit my personality. Wish I was a stunner that could pull that off!

The venue...
I would love to be out under a sea of twinkling lights. Everyone casually chatting, dancing to a playlist concocted by The Hubs and I as the night gets cool and all the girls put on their date's tux jacket or sport coat. I wanted an outdoor event even then but I think Missouri weather disuaded us from even considering it. Although it was a beautiful day. Hot even. **My mom reminded me that is was SUPER windy so maybe it was good indoors.** I dream of exciting destination weddings but in reality, I just want as many friends and family there as possible so I could never pull the trigger on that (even if I could afford it!).

The flowers...
Still pink, still roses. But without the long stems...that was super heavy and not what I wanted anyway. Maybe I'd rethink the bridesmaids calla lilies. Maybe.


The food...
I would choose my favorite foods... cheeseburgers, chips, and Pimms cups. I thought it had to be "fancy" so we had a catered buffet of typical wedding fair. And it was pretty tasty (or at least I thought so, as I devoured the plate my mom had fixed and sent with us to the hotel 4 hours later!!!). I know now that "fancy" isn't really my thing.

I'd also love more photojournalistic (a word?) pictures but that was "new" at the time and SUPER expensive. So we have standard posed shots, a few of which I love. But they're at my casa, not here at my momma's, so I can't share them with you today.

Images via, via, via, via, via, via

Wednesday, September 28, 2011

Week 4: 31 Days to a Better Photo

Here's my recap on what I learned this week...

Day 22: Post Production
I don't use, and don't plan to buy, Photoshop which is Darcy's main focus for the next few days in the Better Photo series. Right now I'm trying to decide between using Picasa and Picnik for minor photo editing. You have probably noticed that my photos are a little different (hopefully better) starting with my ruffle pillow post. Those are done with Picnik. We'll see which one comes out on top! Heck, I might even use only iPhoto once I'm back at my casa (but I already think I like Picnick better).

Day 23: Levels vs. Curves in Photoshop through Day 26: Photoshop Actions & Resource List
Umm. Not a lot to say about the info for these days since I've got no PS. Instead, here's a sample of editing done using Picnik this past week...


Both were resized to 900x600 for easier blog viewing and a watermark was added. The first is SOOC.
But, in the second pic I slightly tweaked the exposure and adjusted the sharpness and clarity. I also used the Effect '1960s' to get rounded corners on the image (I loooooove rounded corners!). But, I think I like the first pic better (with added round corners of course). Which is totally awesome because that means I'm learning to use my camera correctly! Woo to the hoo!


Both of these pics were rotated to portrait, changed to 600x900, and given a watermark using Picnik.
Then for the 2nd image I slightly increased the Highlights and Temperature, as well as adding rounded corners with the 1960s Effect. I think the 2nd image is better in this case. And I can tell you exactly why. I had my white balance set to Tungsten lighting but then was using natural light by the window so the pictures were slightly blue-ish. Voila! I'm able to recapture G modeling her newly made pop-it jewelry (she's been playing with my old toys and its SO fun!).

And my review of the two programs so far...
Picasa:
+ more free options
+ don't have to be online to use it (good for places with no wireless)
+ looks like I can send pics straight to blogger
- the help menu wasn't very helpful (I like step-by-step images...no such luck)
Picnik:
+ its easier for me to navigate
- seems to run super slow sometimes

My feelings will probably change after I use them both more. Also, I've done a brief tutorial for Picnik (here) so I need to do the same for Picasa (here) to even things out.

Day 27: When too much is too much
I'm hoping to take Darcy's advice and use photo editing software to enhance my images slightly. My real goal through this month is to use my camera more effectively so that my SOOC (straight out of camera) shots are almost good enough to toss directly in a frame or throw on the ole bloggeroo.

Day 28: How to Resize your Images to Use on the Web
I love, love, love that Darcy shares resizing info for Picnik so that those of us without Photoshop can still make this important change for our blogs. But actually, I didn't need it because earlier this month Shelley from House of Smiths posted a mini tutorial for Picnik and I started resizing my photos then. I feel like such a schmuck because I haven't been doing this all along. Maybe I'll go back and resize and reload all the pics from my previous posts.

Ha! Not!

Anyway, only 3 days left in the better photo series but then we'll start 31 Days of Photo Tips. There are a few other 31 Day series starting Saturday also. I plan on joining in on the fun! Do you?

Friday, September 23, 2011

61 years {and a photo wreath}


Today my daddy turns 61 years old. We are extra glad to celebrate because he is battling cancer and as many of you know that makes each day, and especially each birthday, more precious. My sister made a photo wreath displaying some of his old family photos. Its a quick project and so fun to look back and remember his carefree childhood days.


I gave my sister a hard time because she doesn't have a fall wreath on her door yet (doesn't she know its official TODAY!).

magnetic photo wreath

Wasn't he the cutest, chubbiest, little baby?!? In addition to photos, she also used his 1st birthday invitation, a report card from second grade (he tried to explain away his low grade in religion from Catholic school!), and his high school graduation announcement. To make this yourself all you need is:


super strong mini magnets, metal wreath form, a stack of pics

You can get both the magnets and wreath form at Hobby Lobby, Michaels, JoAnns, etc. for under $15. And if you have a coupon or wait for the sale then the project would be even less expensive. Such a fun way to share photos! And you can change it up seasonally or with your mood. I'll definitely be getting the supplies for this next time I have a coupon or see a wreath sale at Michaels.

Love you so much Daddy! Thanks for being the best vacation dad a girl could ask for and for loving me even when I wouldn't practice my pitching (ah, teenagers!).

I'm linking up!

Confessions of a Stay At Home Mommy


Tip Junkie handmade projects


Join  us Saturdays at tatertotsandjello.com for the weekend wrap up party!


Weekend Bloggy Reading


I Heart Nap Time

Home Stories A to Z

Wednesday, September 21, 2011

Week 3: 31 Days to a Better Photo

I can't believe I'm well over half way finished with this 31 day series! And that I'm still on track to finish before October! Here's the latest...

Day 15: Histograms in the Field
First off, let me say that I LOVE using the display screen that shows the histogram for reviewing my photos. Now. Before I didn't have a clue. Once again, thank you Darcy! And, the cool thing about my camera (and maybe they all do this) is that the white (255) or black (0) spots flash on the screen so I can tell, even in a tiny 1 inch-ish image, where the super light or super dark spots are. This is great because sometimes, as Darcy mentions, its ok. Like in this pic of the pillow I made.


The area behind the chair and pillow was flashing on my camera display screen and I could see on the histogram that there were bars in the 255 spot.


I took this image with my iPhone so you could see what my display looks like.

But, because I felt that the light filled window could be super light and not affect the image I was trying to share, I was OK with it. Make sense? Well, it does to me (thank goodness) and I'll be using this feature on my camera a lot now.

Day 16: Exposure Compensation
OK, so I have a confession. I didn't watch the tutorial video Darcy included about setting exposure compensation. Its not because I'm lazy, I swear! Its because my little squirt was sleeping and I couldn't turn up the sound on the computer. But, I did read my trusty, never dusty, manual and learn how to use this feature. On my camera, this only works in Tv and P modes. Which I don't use very much. Because now I'm shooting mostly in M. So I don't have a pic to share but I'll be armed and ready if the situation ever arises.

Day 17: The Low Down on Lenses
Unfortunately, I already knew that my lens sucks. Or maybe its a good thing I already knew or I'd be sad and defeated from reading this post. I'm thinking about getting a 50mm f/1.8. Its really the only thing I can afford. My sister has one so I'm going to put it on my camera and try it out this weekend. That's why I have a Canon. My sister is a Canon girl and I thought it would be good if we could talk about stuff and help each other out (although she does more helping than I do...maybe not after I finish this Better Photo series, huh?!). Moving on...

Day 18: What Camera do you Have?
Darcy takes this day to talk about photography as art. Basically saying that someone with a good camera can still take crap-ola pictures but that a true photographer, a true artist, can get amazing images even with something as basic as a camera phone. Adding also, and very importantly, that a good/great/amazing camera serves as a tool for making a great photographer even better. I get all that. Which is why I'm hoping that I come out of this on the other end taking the best photos that I, Carrie, am capapble of with the tool that I have. Which is a Canon Rebel xsi (450D), by the way.

Day 19: When Natural Light Won't Cut It
This post wasn't really for me. I'm probably never going to get any other equipment (except a new lens) for my camera. I'm not looking to make any money taking photographs or anything like that. But, I did disagree with her for the first time. She makes a point of saying that she never uses her built in flash (actually "never, ever, ever, without exception" if we're quoting). I don't have a lens fast enough to catch some of the indoor images I want. Shots of my girls doing silly things can't be staged or recreated outside in natural light. Sometimes I don't have time to run around turning all the lights on and opening the blinds. These pictures are for me. For my memories. To document my life. And if I have to turn on the flash, by golly I'm gonna do it. Do I see that the pics aren't as good? Yes. Do I wish they were naturally lit? Yes. But will I miss getting a shot of that moment in time? No way. Not if my camera is within reach. So my flash will get some use (but only a teeny, tiny bit).

Day 20: Art in photography
This is an area that I need to work on. I don't have an artistic eye so I need to learn what I like in images (basically, not seeing the messy kitchen counter in the background has been good enough for me) and how to set up the shots where I have control of the setting.

Day 21: Elements of Composition
Hopefully I'll become familiar with the 9 elements mentioned and it will become second nature to frame my shot according to them. I'm going to try to use the next week to get a few shots using the ideas from this post to share. We'll see how I do, won't we?

I think next week has a lot of info about Photoshop, which I don't have and won't be getting any time soon. I've just started using Picnik so maybe a few of Darcy's tips will be transferable to that or iPhoto (which I don't have here at my momma's house, only back in Vegas).

Tuesday, September 20, 2011

Emily


Emily was angry at the world, and the world was not too pleased with Emily.
From The Joan Walsh Anglund Story Book

Monday, September 19, 2011

Ruffle Pillow Tutorial

ruffle pillow


So this pillow is a birthday present for my sister. Her birthday was in March. Oops. Better late than never, right?
She had seen an image of a ruffle pillow and asked me if I could make her one. I told her "Sure!" then frantically scoured the internet took a quick look on line for a tutorial. But I only found tutorial geared toward using a t-shirt. This just would not do! No, no, no! Why, you ask? Because t-shirt fabric doesn't fray and my fabric definitely does. I needed the ruffles to have a finished, or hemmed, edge. So here is my version of the ruffle pillow tutorial:

You will need (for 16 inch pillow):

1 yard fabric
scissors
ruler/tape measure
coordinating thread
sewing machine
pillow insert or pillow fill
iron

Step 1: Cut 2 pieces of chosen fabric for front and back of pillow.


My pillow form is 16" so I cut 2 16x16 squares. I have learned NOT to cut extra for a seam allowance when making pillows. It looks better when finished. Weird, huh?

Step 2: Cut strips from remaining fabric. These will become the ruffles. My strips are 3x29 inches. I have 12 total for my 16 inch pillow. You may need to adjust this if you're making a larger/smaller pillow. This took FOREVER because I didn't have a cutting mat and rotary cutter, which I recommend. I just used scissors. Bah.


Step 3: Fold each strip in half, right side together. What does that mean? Right side? Its the front of your fabric (in case your a newbie). Sew down the cut edge with a 1/4 inch seam allowance. Just for future reference, I always do a 1/4" allowance.

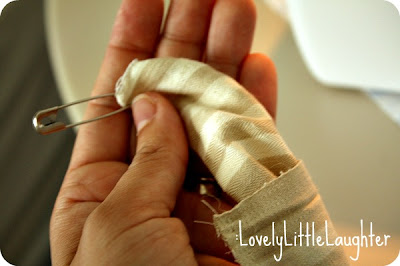
Step 4: You have now created a tube of fabric. But, uh-oh! It's wrong side out. You'll need to turn it by pinning in a safety pin to one end


Push the pin through the inside of the tube, scrunching the fabric as you go until it sticks out the other end and you can pull it through.


turning tube or strip of fabric right side out


Sorry if some of this seems a little too elementary, but I was new to sewing once (wait, I still am!) and these kind of tips would have been REALLY helpful.

Step 5: Press fabric "tube" flat with the seam in the middle(ish) of the back.


Don't worry if the seam is not perfectly straight or perfectley centered. You won't see this part anyway.


You might also want to iron your pillow front and back fabric now, too. Maybe. If you're the ironing type.

Step 6: Now we'll create our ruffles. Set your sewing machine to a longer "basting" stitch. For me, this means putting the length setting on 4 and the tightness (I guess that's what its called) dial on 2 but you'll have to look this up for your own machine. Sew down the center of each fabric strip WITHOUT BACKSTITCHING!!!


You want to leave pretty long "tails" of thread on either end. Also, you want to put the seam that you created down so the bobbin thread is on this back side.

Step 7: Gather the fabric of each strip into ruffles by pulling/holding the bobbin (that's the back or bottom) thread and sliding or scrunching the fabric up.


Woo to the hoo! You've created ruffles. Sort of. They don't look too hot until we put them on the pillow fabric.


Step 8: Pin the ruffles to your pillow front. Grab one of those 16 inch squares (if there is a flaw in either piece, use that as the front. It will mostly be covered by the ruffles). Pin the end of your ruffle flat to the end of the fabric leaving a little bit (1/4 inch-ish) of overhang. Continue to pin the ruffle in place, scrunching and flattening to your liking, across the width of the pillow.


You can pin each one down now, or wait and pin, sew, pin, sew, etc. I like to pin each ruffle one at a time to make sure I like how its looking and because there's less fabric to manuever around the sewing machine. Also, you want to use a pin every inch to inch and a half and would need A LOT of pins to put all the ruffles in place before sewing. I lined my ruffles right up next to each other but if you don't have enough to entirely cover the pillow front, be sure to space them evenly (this might be a good reason to pin all the ruffles BEFORE sewing).


Step 9: Sew down the center of each ruffle. Don't forget to reset your machine back to a regular straight stitch. You can also TRY to sew over the original seam that is there from creating the ruffle but if your thread matches your fabric, well, its not too important (unless you're a perfectionist and in that case, this is probably NOT the tutorial for you).


Repeat this 12 times and voila! you have a ruffle-y pillow front. At this point, you may pause and admire your awesomeness.

Step 10: Back to reality. You still have to turn the ruffle-y goodness into a pillow. Pin the now ruffled pillow front to the plain pillow back with the right sides together (the ruffles will be on the inside against the back pillow fabric). Be VERY CAREFUL to keep the top ruffle from getting in the seam. You don't want to sew it down! Sew around 3 sides (top, 2 sides) and about 2 inches on either end of the bottom, leaving an opening for stuffing in the pillow form or fill.

Step 11: Trim all the crazy threads (and there will be a ton!)


and the excess overhang fabric from the strips.


Step 12: Turn the pillow cover right side out (again, admiring your awesomeness) and stuff that baby!


I prefer pillow forms but if you want a unique size fluffly fill is the way to go.

Step 13: Close the opening left at the bottom. I hand-stitched mine because I have trouble getting my machine close enough to the edge but you can do this however you want. If you're not sure how, just check this out to do it by hand or this if you're going to use your machine.


ruffle pillow


You're finished! Isn't it so awesome?!? I'm going to have to try this again using a variety of colors. I think it could be a great way to use up some scraps and create a seasonal pillow (right now I'm seeing rusty oranges and reds for fall). Hope you will share pics of your ruffled pillows with me. Leave a link to your blog or in the comments!

I'm linking up!


Confessions of a Stay At Home Mommy


Tip Junkie handmade projects


Join  us Saturdays at tatertotsandjello.com for the weekend wrap up party!


Weekend Bloggy Reading


I Heart Nap Time
Craft-O-Maniac
Home Stories A to Z

Wednesday, September 14, 2011

Week 2: 31 Days to a Better Photo

14 days down, 17 to go in my journey through 31 Days to a Better Photo! I'm having so much fun seeing my pictures get better right before my eyes. What a wonderful tutorial Darcy put together. I'm so excited to stay on track with this through September so I can follow along in real time for her 31 Tips this October. Maybe I'll even be able to link up!

Day 8: The exposure triangle
OK. So I love how she explains getting the right balance between shutter speed, aperture, and ISO. Comparing it to a suntan = genius! Made perfect sense to me. I knew that each different factor impacted the photo but never got how they worked together. I just pushed buttons and rolled dials willy nilly.

Day 9: Scales
I'm not sure how much of this info I'll actually think through when taking my photos (half what? double who?), but I like that she pointed out that with practice, just like playing the piano (or typing on a keyboard), it will become second nature to adjust the settings. I'm already noticing how much more quickly my finger finds the shutter speed dial or ISO button!

Day 10: Meter Maids - In camera metering
This was HUGE for me!!! I guess I had noticed that little numbered bar on my screen and at the bottom of my view finder but I'd never really NOTICED it. Maybe I assumed I was never going to be good enough at using my camera to worry about it, or thought that having an expensive camera alone was enough to get better pictures. I'm not sure. But now that I know its there, WOWZA!, have my shots improved. Even if I have to turn on the flash inside because my girls are too quick, I'll know it before the moment passes by seeing that the pic is too dark even before I take it! A.Mazing.

Day 11: Tips for Shooting Manually - Link up
I practiced putting all the tips together and I think its going great. Here is a sample shot that I took:


ISO 200 f/4 1/8s

This was taken inside with NO flash. Usually my indoor shots are horrible (not that this is awesome but its much better than my usual stuff) unless I open every window and find the most well-lit (with natural light) spot. The key was leaving my ISO at 200. In the past that was the first thing I adjusted...upping that baby to 800 inside. But my pics always had a lot of noise (that's right, before Darcy I would've said they were "grainy" but now I know the dotty pics have "noise" with digital). It was so frustrating. Now, I did use a mini tripod which made the image clear and I won't always be able to do this (when shooting a lightning fast 3 year old), but it should be great for getting better pics for the blog! Adjust aperture or shutter speed first! Shoot slow to let in more light. Got it.

Day 12: Whats White Balance?
I recently started adjusting the white balance on my camera using the preprogrammed settings so this wasn't as much of a shocker as it would have been a month ago. Check out my birthday party pics from last month, then look at old indoor pics from the blog to see how much difference it made. Seriously awesome change with just a tiny bit of work. But here's a sample using all the white balance settings on the old Canon.


For all images: ISO 200 f/4.5 1/8s

The Auto, tungsten, and custom are by far superior to the other settings. I think tungsten is the best, as it should be, since I was under regular household bulbs. Auto looked good and the custom is pretty good, but I just used whatever custom setting was already on the camera. I hadn't done anything to set that myself. Yet.

Day 13: Setting Custom White Balance
I was SO excited (and nervous) to try this after reading Darcy's post. A Canon is harder than a Nikon? Uh-oh. Now, I'm a Canon owner and she had me skeered! But, instead of watching the you tube video she talks about, I turned to my trusty manual to set my custom white balance. And I didn't think it was that hard. Maybe I'm doing it wrong? It only took me about 30 seconds to a minute to set it. I kinda feel like I HAVE to be doing it wrong if she says its supposed to be hard. Now my confidence is shakey. Bah. Anyway, here are the shots I took:


All images: ISO 200 f/4 1/10s

Both the Auto white balance and tungsten images are OK. At least I would have thought they were OK before setting my custom WB and getting that last shot! I am stunned at how "white" it looks. The other photos seems so orangey-red in comparison. I used a plain sheet of white paper to set my WB but will be trying grey paper as soon as I can get my hands on some. I thought about using a grey shirt but went with white this time, as my manual suggested.

Anybody notice a theme here? Playdoh food. Crayons. Lightning McQueen. I wish I had pretty pictures of artfully arranged flowers or styled bookcases but thats just not my life right now. And I'm OK with it. I'm loving my time with my girls. Especially while their daddy is far, far away.

Day 14: Histo-huh? What's a histogram?
I'm pretty excited to learn how to use the funny little chart on my display. Even with screens as big as they are now (our old digital camera had a 1.5" screen) its so hard to see the picture until its on the computer. I always think of earthquakes when I see that feature on my camera. But, you'll have to wait until next week's update to see if I figure it out...

So. On to week 3. I'm really pleased with all I'm learning. Hopefully you'll see the improvements I'm making, too.

I'm linking this post up to Darcy's Sweet Shot Tuesday party! First time for me and I'm a little nervous...

Sweet Shot Day