Showing posts with label rainbow theme. Show all posts

Monday, August 29, 2011

Poms the bomb.


I've been on a kick lately of using old-school, common crafting materials to make stuff. First was the felt circle pillow (um, using what else, felt), then the circle paper garland (regular construction paper), and now I'm gonna show you what I did with little fuzzy pom poms. I don't think I've even touched one of those since vacation bible school when I was 10, but retro is cool, right? Anyway, I was inspired by this image from Pinterest:


Source: pickles.no via Lovely on Pinterest

These are some much fancier type of ball but I just loved the look and decided to make my spin on it for E's birthday. I got a big ol' E from JoAnns, a few bags (I used almost 4) of poms at Michaels, and wet to work with my hot glue gun.

First I painted the cardboard E because, you know, it was brown. I just used some white wall paint that was left by our builders. I think if I'd used craft paint I could have done the project with Elmer's glue but the interior paint was a little too slippery (and The G didn't appreciate the blister she got from touching some not-so-dry hot glue. oops.).


I think if I'd used craft paint, I could have done the project with Elmer's glue but the interior paint was a little too slippery (the Elmer's would have been nice because The G didn't appreciate the blister she got from touching some not-quite-dry hot glue. oops.

Here's an in-process shot:
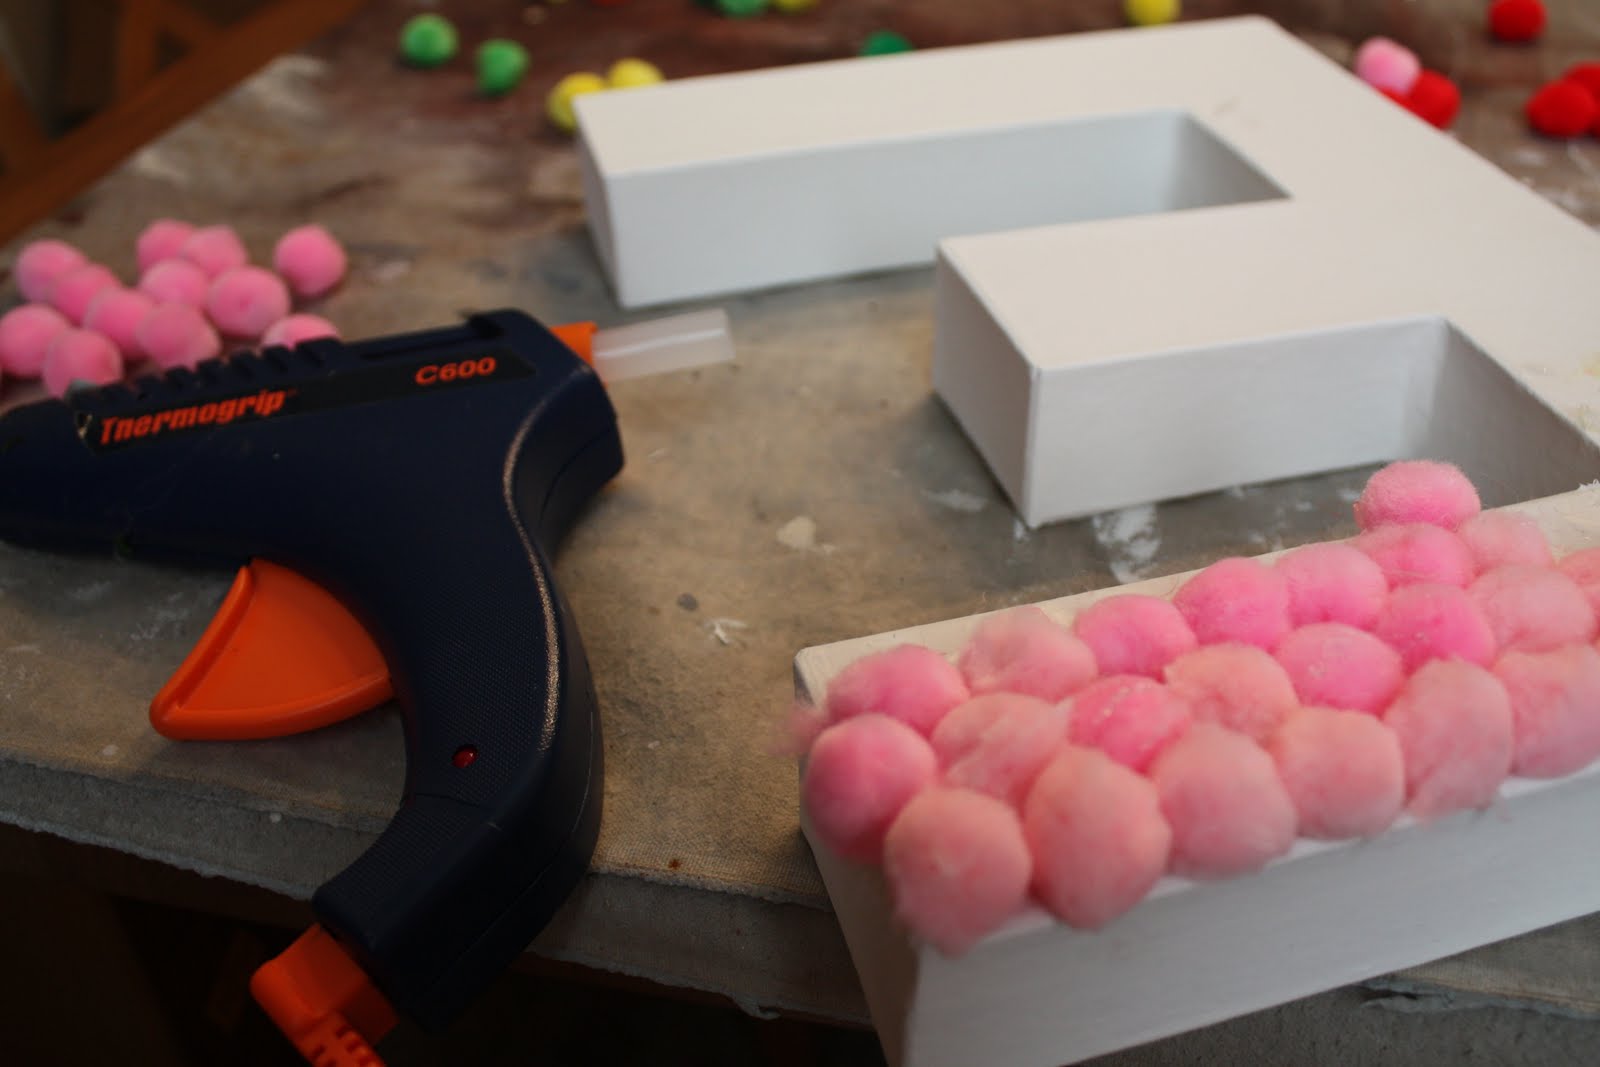


I was making this for her birthday so I went with the rainbow theme and I think it turned out super awesome!

rainbow pom pom letter

I hung it on the front door on party day, brought it in after everyone had arrived for some photos, and now I think I'll hang it in her room. I'm hoping this can be a photo prop for all her future birthdays (at least until she's 12 or so and thinks everything I do is totally lame). What do you think? Sound like a good idea?


This was at 8:30 at night after the party. She was definitely ready for bed so I need to set Sweet E up with her "E" again for a true photo op.

Have you done any crafts lately with elementary-school inspired materials? Finished any Pinterest inspired crafts? Let me know! I'd love to check them out.

Update: The day I wrote this post I got an issue of FamilyFun Magazine in the mail and lo and behold, what was on the cover? You guessed it. A pom pom craft.


Looks like these little guys are making a resurgence (or maybe they were never uncool?).


I'm linking up at:

Confessions of a Stay At Home Mommy


CraftOManiac

Thursday, August 25, 2011

The icing on the cake! {A rainbow cake tutorial}

six layer rainbow cake

I want to talk to you about the rainbow cake. You know the one. I showed you mine and if you're a blog reader I'm sure you've seen at least 3 others. What you haven't seen is the dirty, seedy underbelly of multi-layer cake making. So I'm here to expose the truth. This cake is actually easy peasy lemon squeezy. Sort of.

First tip. You need to start early, allowing at least two hours for the cake to sit in the fridge after the crumb layer of icing is added. I started the night before.

Some of this info will come as no surprise, but being my first time making more than 2 layers, I had a lot to learn. And decided that my daughter's first birthday cake may not have been the place to try out this new baking apron. Oh well, too late. Here's what you need:
  • two boxes of white cake mix and eggs, oil, water. With me so far. Just checking.
  • 3 eight or nine inch round pans in helpful but you at least want 2 (I used the aluminum disposable kind that come in a 3-pack and they worked great)
  • a boatload of white icing (I used whipped fluffy white, yummy stuff), I used 2 large containers and 2 1/2 small containers. Seriously. I suppose you could skimp a little but this cake is all about going overboard, right?
  • food coloring. I read that you should use the gel kind but I used both and got vibrant colors. I guess the fear is that the liquid, old-school kind might change the consistency of the batter making it bake weird but I didn't have any trouble. Well, not with that part anyway.
Now we're ready to start.
  1. Make the first box of cake according to package directions. I read one tutorial that suggested you mix both at the same time but I didn't want all 6 layers in the oven at once. I was afraid it would throw off the whole chemistry-science-y thing of baking by overloading the oven. I'm pretty sure Alton Brown would agree. Plus, you can mix the second cake and color it while the first batch bakes.

  2. Divvy your batter into 3 bowls. Use between 1 1/3 and 1 1/2 cups of batter for equal layers.

  3. Add food coloring.


    We did the purple (blue + red people...more blue), blue, and green first. I used a lot because I wanted it super vibrant but remember that the color will deepen as it sits and bakes. So if you want pastels just use a tiny bit OR go crazy like we did and use half the bottle of each color. Whatever floats your boat.

  4. Pour the batter into 3 greased pans and bake at 350. DO NOT turn your oven off when you are setting the timer. Why would you do that? I'm not sure but I accidentally did and it sucked. When I checked the cakes after 15 minutes not only were they not baking, but they were barely luke warm. Oops. My bad. So I had to babysit them and PRAY that they turned out ok. Which they did. Phew. Dodged my first bullet.

  5. Repeat steps 1-4 but use red, orange, and yellow food coloring. Also, skip that whole turning off the oven part. Here's where I can tell you to bake the layers approximately 23 minutes (if you've divided the batter into 3's. If you're crazy and going for 8 layers I can only offer this piece of advice... OK. I have no advice for that. Good luck, freak.).

  6. Let the cake cool in the pan 10 minutes then turn out onto cooling rack. Let it cool completely before icing.
Now, on to the icing of this monstrosity. Here is where things got a bit tricky for me. Don't worry, I'll share all the gory details.
  1. Place sheets of parchment or wax paper on your cake stand/plate where the edges of the cake will be.


    This lets you ice all willy nilly and not worry about having a messy looking plate when you're done.

  2. Place the first layer on the plate, purple in my case, and ice the top. Make this as thin as you can stand (I used quite a bit because I lurve icing) because you don't want the next layer to slip off.

  3. On to layer two, blue. THIS IS IMPORTANT!!! Place this next layer with the TOP DOWN (the rounded part). You can of course, trim the layers so they are nice and flat but I think this is hard and you end up with less cake (for shame!). By rotating the layers you keep the cake more level and don't get a big rounded top with slopey sides. You will see why this is important in just a second and also that I was not this wise 2 nights ago. Then ice that layer.

  4. Repeat the layering, icing steps with green, yellow, orange, and red remembering to alternate the way you place the layer.


  5. Does that make sense? I hope so. Because if you don't do this (or cut the rounded bit off) this will happen:

    crack in layer cake

    It may look like a small crack to you, but to me, it was the Grand Canyon of cakes. I tried sticking wooden skewers but it just kept cracking because the top was higher than all the sides. See why you want to alternate the layers. Oh, and Mom, thanks for telling me this little trick when I was placing the LAST LAYER! But, my friend KC saved the day (you'll see how in a second).

  6. Next, put a thin layer of icing around the sides (this is called the crumb layer). I then propped up the side of the cake with a bottle of KC Masterpiece and stuck that puppy in the fridge overnight not knowing whether I would have a salvageable cake in the morning or not. Hopefully you'll be able to skip this step.

    propped up layer cake

    In the morning, she had hardened just enough that there was no more slippage and the bbq sauce bottle had saved the day! Sweet hallelujah!

  7. The last step is to finish icing the cake (which didn't get any weird crummies on it because of letting that first, or crumb, layer of icing harden in the fridge).
Now I waited. 3 1/2 more hours until the party, in fact, to see if my cake would look and taste ok.


And as you can see, it was wonderful! Huge hit, the crowd oohed and ahhed as my husband sliced it up. Seriously. They did. Then they devoured it. I was worried that being in the fridge overnight would make it weird or that my snafu with turning off the oven had ruined layers 1 through 3 but no, it was delicious. Or scrumptious, as G would say. In fact, she actually said, "This really tastes like a rainbow!" That made it all worth it.

slice of six layer rainbow cake

I hope this has been a lesson to all of you that you should practice something important before winging it the night before it is due. Wait. Didn't I do that all through college? Anyway, I probably haven't learned my lesson on trying something new without a dry run when I'm under the gun, but I did learn how to make a six layer rainbow cake.

rainbow cake

I'm linking up at:

Home Stories A 2 Z


Weekend Bloggy Reading

Tuesday, August 23, 2011

First birthday part-ay!

E's big birthday bash was a smashing success!

1st taste of birthday cake

We had such a fun time and the rainbow cake was a huge hit. I'm going to post a tutorial what-not-to-do list on making the cake because I learned a lot about working with layers while I slaved away on this cake labor of love for my baby girl. I know its been done a million times this year already but I stumbled across some things that I think can help others out if you're trying to make a similar tower of baked yumminess.

six layer rainbow cake

Here are a few more shots from our rainbow themed soiree. I hope you enjoy sharing a little in our fun day (although I have to say you totally missed out because this was one kickin' par-tay!).

cake table first birthday party rainbow theme circle garland

I made a rainbow garland, had different colored bags for favors, and used A LOT of candy to tie into the theme. We also had rainbow fruit kabobs (and a veggie tray and pizza).

circle rainbow garland

I used a two inch and one inch punch for the rainbow garland and I will be making this for EVERY party and holiday for the rest of time! I thought it was so fun and it was definitely an easy project. Two pieces of 10 different colors with two punches made roughly 70 feet of garland. Although I highly suggest NOT wadding it up in a plastic bag before using it because it got SUPER tangled. Duh. I had to cut it apart (which was ok because I needed some of it in segments) or lose my mind. I chose the former.

first birthday rainbow decoration and cake

I got a set of rainbow party hats at Target and added a one and some fuzzy pom poms to E's so it stood out from the others. All the kids enjoyed wearing their hat while we sang happy birthday. Here's my other sweet girl rockin' her rainbow look.


Like I said, the cake was a big hit and everyone thought I was A-Mazing for making it, but these fruit kabobs came in a close second in the "aren't you so clever" and "what a fun way to serve the fruit" department. There was also NONE left at the end of the night. I thought about layering it in a glass bowl trifle style but I'm so glad I used the skewers. Will be doing this again for sure.


And another shot of the cake because I'm so proud of it. There was blood, sweat, and tears involved, people! Like I said, more deets about that later. I think it deserves its own post.

And finally, a shot of the whole fam with the birthday girl. I love you so much Sweet E!


Tuesday, August 2, 2011

Join the Pinterest Challenge!!!

I linked up my bunting birthday invite today!


Check out the deets in this post. You have all week to link your Pinterest inspired projects to Young House Love, Bower Power, Style by Emily Henderson, or Making a House a Home. Also click on these links to see their cool projects and the bazillion other amazing DIYs that are linked up.

I have a personal rule with link parties that I like to follow to make sure that I read other posts. In addition to clicking on any cool project that I see when scanning the linked thumbnails, I also ALWAYS visit the link (or 2 depending on time) before and after mine AND I leave a comment on those blogs. I figure its a really nice way to share the love. And, if everyone did this, each and every post would get 2 new commenters/viewers. Nice, huh? So if you're linking up why don't you consider doing the same, kay?

By the way, I'm #205 over at YHL! And way to go #204, Petra at Sunshine + Smiles, who planned to do her closet but added flair to a FAB purse instead, and #206, Erin, who created super cute Heart Art that I WILL be copying for G's room!

Saturday, July 30, 2011

Challenge accepted!

And accomplished!

pinterest challenge banner

Sherry, Katie, Emily, and Lana have declared a Pinterest Challenge! What is it? Well, basically its a call to get your rear-end in gear and actually complete one of the DIY knock offs that you want to do from your Pinterest boards (check out any of their pages for a MUCH more exciting description). I know I have a few things pinned that I want to create and this was a good kick in the pants to get me going.

With my little E's birthday coming up I decided that working on something for her party was priority numero uno.

pinterest board first birthday

E's first birthday Pinterest board

And whats the first thing you need for a party? That's right! Invitations!!!

first birthday invite

Invitation originally from HERE.

And here is my knock off version:

first birthday invitation rainbow pennant banner

I used PowerPoint to create it and made the pennant with triangles, adding the colors and patterns to go with our rainbow theme. Each pennant has a different pattern which is hard to see in this pic but it adds a lot to the cuteness. I still need to buy cardstock for printing but that's the easy part, right!

And along the lines of the party... I started feeling a little bad for being so unoriginal. The rainbow theme, the rainbow cake, the pennant banner, the Martha poms...well, its all been done so well (and not so well) over and over again. But then I decided, if it wasn't so cute and clever it wouldn't be repeated, right? And it will be a fun reminder in 20 years of what was popular and stylish when my sweet E turned 1.

So don't worry if you're a fan of sticking to the trends and incorporating things all over blogland into your life, home, and decor. If its beautiful to you and makes you happy, I say go for it!

Hope you've been inspired to knock one of your Pinterest to-do's off the list, too! Join the fun and get on board with the Pinterest Challenge! I'll be linking up my invite tomorrow, August 2. Will you be linking up?

Monday, July 25, 2011

Paint chip pandemonium!!

Have you noticed all the fun paint chip DIY projects out there lately? What a great way to use the 20+ little squares and rectangles always laying around after a project (I know I brought home a gazillion when choosing a blue for g's room here, here, and finally here). There are a few that I find inspiring...

paint chip banner
Sugar and Dots


paint chip banner
A Bit of Sunshine


paint chip eggs banner
Modern Parents Messy Kids

I love all these ideas for my little E's rainbow party next month. But, at what point does "taking" these "free" paint chips become stealing? I think its obvious based the color schemes above that these weren't leftovers from a project. Hmm. I'm struggling with a moral dilemma (but they're so darn cute).

Tuesday, July 19, 2011

Bye-bye baby. Boo hoo.

My sweet little E was officially 11 months old on Sunday. Its was quite a challenge to get a pic and I eventually had to turn on my flash (gasp) to keep the photo from being blurry.


She says "mama" "dada" "bye-bye" "nite, nite" waves, claps, commando crawls, and other general awesomeness. We love her so much (even if she is extremely demanding and expresses every emotions the second she feels it with extreme gusto).

But even more exciting (or sad, I'm not sure which, MY BABY!!!), is that I'm planning her first b-day party. Like so many others, I'm jumping on the rainbow train. I don't think there will actually be any literal rainbows, just the color scheme. EVERYTHING will be Roy G. Biv'd. Here is a glimpse at my Pinterest board for the par-tay.


I've only just gotten started so if you have any great ideas or links, even if they're not rainbow themed but can be adapted, pass them my way!